Tuesday, January 17, 2012

French chair redo, and DIY chalk paint

Well, I did it.  I moved into the new shop over the weekend, and I realized one main thing-- I really have to work in the next few weeks to put more pieces out.  I don't have enough!

This little reproduction French chair is one piece I refinished recently to move into the shop.


As you can see, it really wasn't in bad shape, it just needed a little dose of fun.  I started out by painting it with homemade chalk paint.  I told you I'd share the mixture this post, and so I will break in the before and after to tell you about it.  It's nothing new, but it's not widely spread around blog land as an option yet, so I hope it's new to you!

Let me start out by saying that I love Annie Sloan chalk paint, but don't love the prices and that you basically need a full supply of stock to be able to mix and achieve the color you're looking for.  Anyhow, late one night I was searching blogland, and came across Villabarnes blog.  She had some beautiful furniture redos, and as I read in them, I learned about her DIY chalk paint.  She uses a 50/50 mixture of gesso primer to latex paint, and then add a little water to make it the consistency of paint (gesso is thick!).

That's it.  Big secret, eh?  I was a bit skeptical and did more research at first.  I entered "gesso chalk paint" in google to see if anyone else had discovered this revelation, and the first site that popped up was this: http://www.earthpigments.com/finishes/gesso-chalk-paint-for-furniture.cfm

Yes.  A site that spells out using gesso chalk paint for furniture!  It also has a recipe to make your own gesso if you want to buy all the supplies to do it yourself.  Personally, I just purchased my gesso primer in the artists paint section at Hobby Lobby.  With a 40% off coupon, I came away with 84 1/2 ounces of primer for $9...pre-made.


But just what is gesso?  Well, it's an artist primer sometimes used to prime canvases.  It prevents paint from soaking into the piece, and gives the surface a little more texture so the paint sticks better.  Originally it was made with calcium (like chalk) and animal glue, but nowadays it's a mixture of calcium carbonate, a pigment, and an acrylic polymer medium.  You can buy it in black, grey, and white to better match to the color you're trying to achieve.  

I've been really happy with this mixture, and have found a few others out there in blog land who use it with great results too like Liz from The Midwest Cottage (she might actually make her own gesso?) who has some BEAUTIFUL pieces under her belt using this type of paint, as well as a variety of others.

Unlike the unsanded grout/latex paint combo, this mixes and goes on smoothly since the gesso is already a creamy, paint like mixture.  It also stores perfectly well if you mix up more than you need at one time, unlike unsanded grout, which will harden or stink like crazy if you try to store it pre-mixed.  It dries just as quickly as ASCP, and distresses just as well in a fine, chalky powder.  You still need to seal it with a wax (I use Fiddes and Sons), just like ASCP.

So that's it!  I hope you all try it, and please come back to let me know how you liked it!

Okay- onto the after.  I tightened the frame, replaces some screws, and painted it with my gesso chalk paint mixture with a gallon of oops paint I bought from Lowes that mimics ASCP Old White or Creamy from Sherwin Williams in color.  I distressed it with a sanding sponge, and sealed it with clear wax.


I reupholstered the chair in Dwell Studio's New Peony Canary (indoor/outdoor fabric).


That's it!  I also added some padding and upholstered the little armrests that were all wood before, and finished the piece with piping/double welt.  The end result is much more bright, fun, and modern.


She's now for sale at Flea Market to Fabulous in the yellow/gray corner, and looks cute as could be!


Hope you enjoyed!


Sharing at:
Restore Interiors
Domestically Speaking
Savvy Southern Style
Primitive and Proper
Coastal Charm
Beyond the Picket Fence
2805
The Shabby Creek Cottage
Miss Mustard Seed

Monday, January 9, 2012

Beauty and the Beast...a tale of two pieces (and some exciting news!)...

Hello, friends.  It's been too long.  I'm sorry I've missed you to tell you Merry Christmas, and Happy New Year.  I was so busy with projects for my family, and actually spending time with them, that I couldn't find the time...and afterall, I think that's the way it should be.

Onto the story...

I grew up (mostly) in an older house in a small town.  Today, my mom and younger brothers still live in that little old house, and I've moved on with my family in my own little old house.  If you live in an old house, you know that storage is usually an issue.  For my mom, it's no exception.  She has lived with the smallest closet in the world for my entire life-- first sharing it with my dad, and now having it completely to herself, and it's still too small to fit her clothes (and not because of an over-abundance of clothes either!).

This fall, she started hinting at wanting an armoire. Hinting became telling, and soon I found emails filled with antique armoires coming to my inbox.  I knew that's what I would end up getting her for Christmas.  I picked up one armoire early on, but as the emails progressed, I realized it wasn't really what she was wanting.  She needed something with room to hang clothes, and the one I found just didn't have ample space in the top to let a shirt hang.  I had to keep looking...

On another trip shopping with Mom, she stopped to look at a French nightstand.  She liked it, and told me about how she wanted to redo her bedroom, and she would like the distressed French look.  A few weeks later, I found this little beauty at a Salvation Army for $25 (more than I usually like to spend, but these seem so rare to find around this area!), and picked it up for her.


The week before Christmas came, and my hunt for the right armoire was still ongoing.  I couldn't find a thing...not in my price range at least.  Then, three days before we were to have Christmas together, a Thomasville armoire popped up on CL for $75.  It was big.  Big enough to be it's own closet and to have a hanger bar, but it wasn't an antique.  Still, it coordinated well with the little nightstand, and the price was right.

With it getting as late in the game as it was, I took the chance on it.  Afterall, if she hated it, at least I had a place to sell it.  My little brother ("the muscle") and I picked up a trailer and headed to St. Louis for it.  I'm so glad he was with me.  There's no way it would have made it home with me without him.  It took four people, and a lot of maneuvering and straps to finally get it in the 5x8 trailer on it's side, because it wouldn't fit on it's back.  It was, in every sense of the word, a beast.


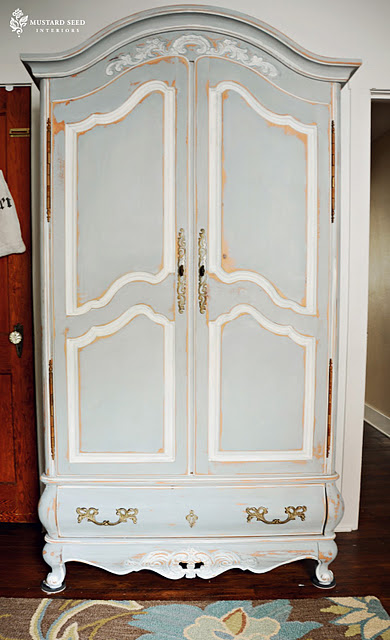
I went to work on both pieces.  I used Miss Mustard Seed's French armoire, as well as And George's French armoire as inspiration.  I love the grey and cream color combo.  It would go perfectly in my moms room, and I loved how And George's piece was careful to use the cream only on the outer curve of the grooved details.


I painted the pieces with a homemade chalk paint (and not what you think!  I'll share more on my next post!), and added a decorative piece to the bottom of the armoire.  I thought it was a bit plain without it, and it needed another pop of cream.  Unfortunately, I didn't finish the entire piece before we had Christmas, but it was far enough along to show.  I wrapped them up, and gave them to my mom and let her tell me how much distressing she wanted on them.


Later that week, I distressed them and went over them with clear and dark wax.  I sprayed the hardware with oil rubbed bronze spray paint, and sanded them lightly to bring the brass through a bit.  Finally, I added the much-needed hanger bar.  They were finished and it was time to move them.  Three of my brothers came over and we loaded them up to go to their new home.  After a bit of moving, her new pieces were where she liked.  She loved them, and moved her clothes right in to the armoire, and kicked her old nightstand right out.

Without further adieu...

Beauty


and The Beast


They work perfectly in my moms room.  While I was there, I distressed and glazed an old mirror of hers that we had previously sprayed white.  It's now hanging above her mom and dad's old dresser that's adorned with pictures of her mom in her youth, and a family portrait of my aunts and uncles.


Mom's room is pretty close to finished now, and I have to say, it looks great.  Aside from some new curtains, the only big furniture piece to still be replaced is the headboard, and we'll get to that someday.


And finally- for a little blurb of exciting news-- I'm moving!  Yes, it's not been long since I moved into the antique shop, but wouldn't you know that opportunity knocked, and I answered.  I'm moving into a specialty shop in town for furniture and re-purposed goods called Flea Market to Fabulous this weekend.  I couldn't be more excited, and can't wait to share more with you about this exciting new step!


Until next time,


Sharing at:
Coastal Charm
Restore Interiors
Domestically Speaking
Savvy Southern Style
Primitive & Proper
The Shabby Creek Cottage
52 Mantels
Beyond the Picket Fence
Blue Cricket Design
Home Stories A to Z
A Bowl Full of Lemons
A Stroll Thru Life
House of Hepworths
Miss Mustard Seed

Thursday, December 15, 2011

Antique Music Paper Ornaments

Two weeks 'til Christmas, and I'm JUST now getting you my version of Miss Mustard Seed's Christmas ornaments that I've already been promising for two weeks.

Photo courtesy of Mustard Seed Interiors.


Let's just get right to it.  I use old hymnals for this project.  They're the perfect size, have plenty of double sided pages, and usually already have that nice aged look to them.  The ornaments I'm going to show you are pretty large, but you could easily use the same method with even smaller pieces.

To remove the pages, score as closely as you can to the binding, and gently pull out.  They should release pretty easily.


Take your sheet of music paper and fold it in half length-wise.


Fold it back and forth a few times, and it should easily tear apart.  If it doesn't, use scissors.  My paper is pretty delicate, and you don't want it to rip.


Starting at one end, accordion fold it like you used to when you were a little girl making paper fans.


Try and make your folds the same size.  They will end up like this when you're done.


Three half sheets will be full enough to make a full circle.  The accordion strips have to be attached together.  To do this, match up one end of one that points up with the end of another that points down.  


Use your hot glue gun to put a strip of glue along one side, match the two together, and press.  Be careful though- hot glue's really hot! Ask me how I know?...


Once you have a long strip of three half sheets, you'll wrap the end around and glue an end going up to an end going down as you did before.  If you happen to have two ends going in the same direction, just remove one of the last folds to get them in the right directions before gluing.  It should end up looking like this:


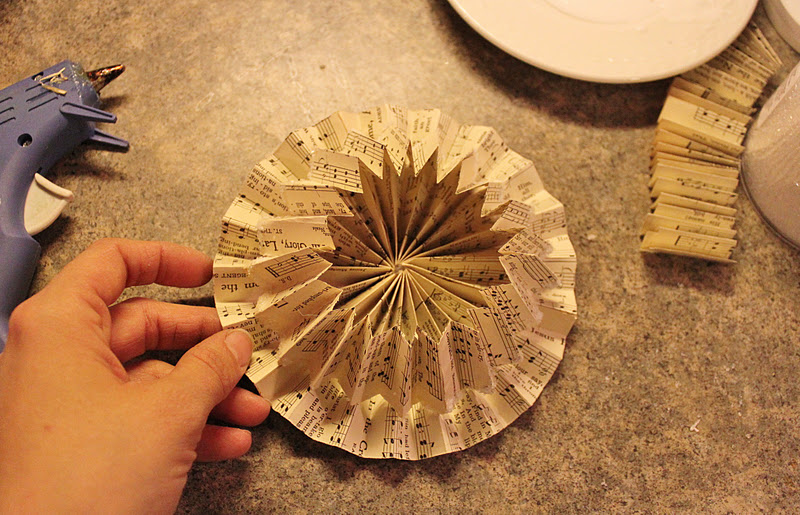
To get the flattened, circular fan shape, cup the circle in your hand and gently pull the top in as you push down.  It will gradually start to flare at the bottom.


Put a dab of glue in the center and hold it together, then turn it over and do the same on the opposite side.  You now have a flared circle.


You can put some glitter on the edges, put your string on it, and leave it as it is if you like at this point.  This is how Miss Mustard Seed's look.  I take it a few steps further. To make the inner circle, take one of the long set of three strips you've already made.  Push the accordion folds tightly together, and cut it in half.


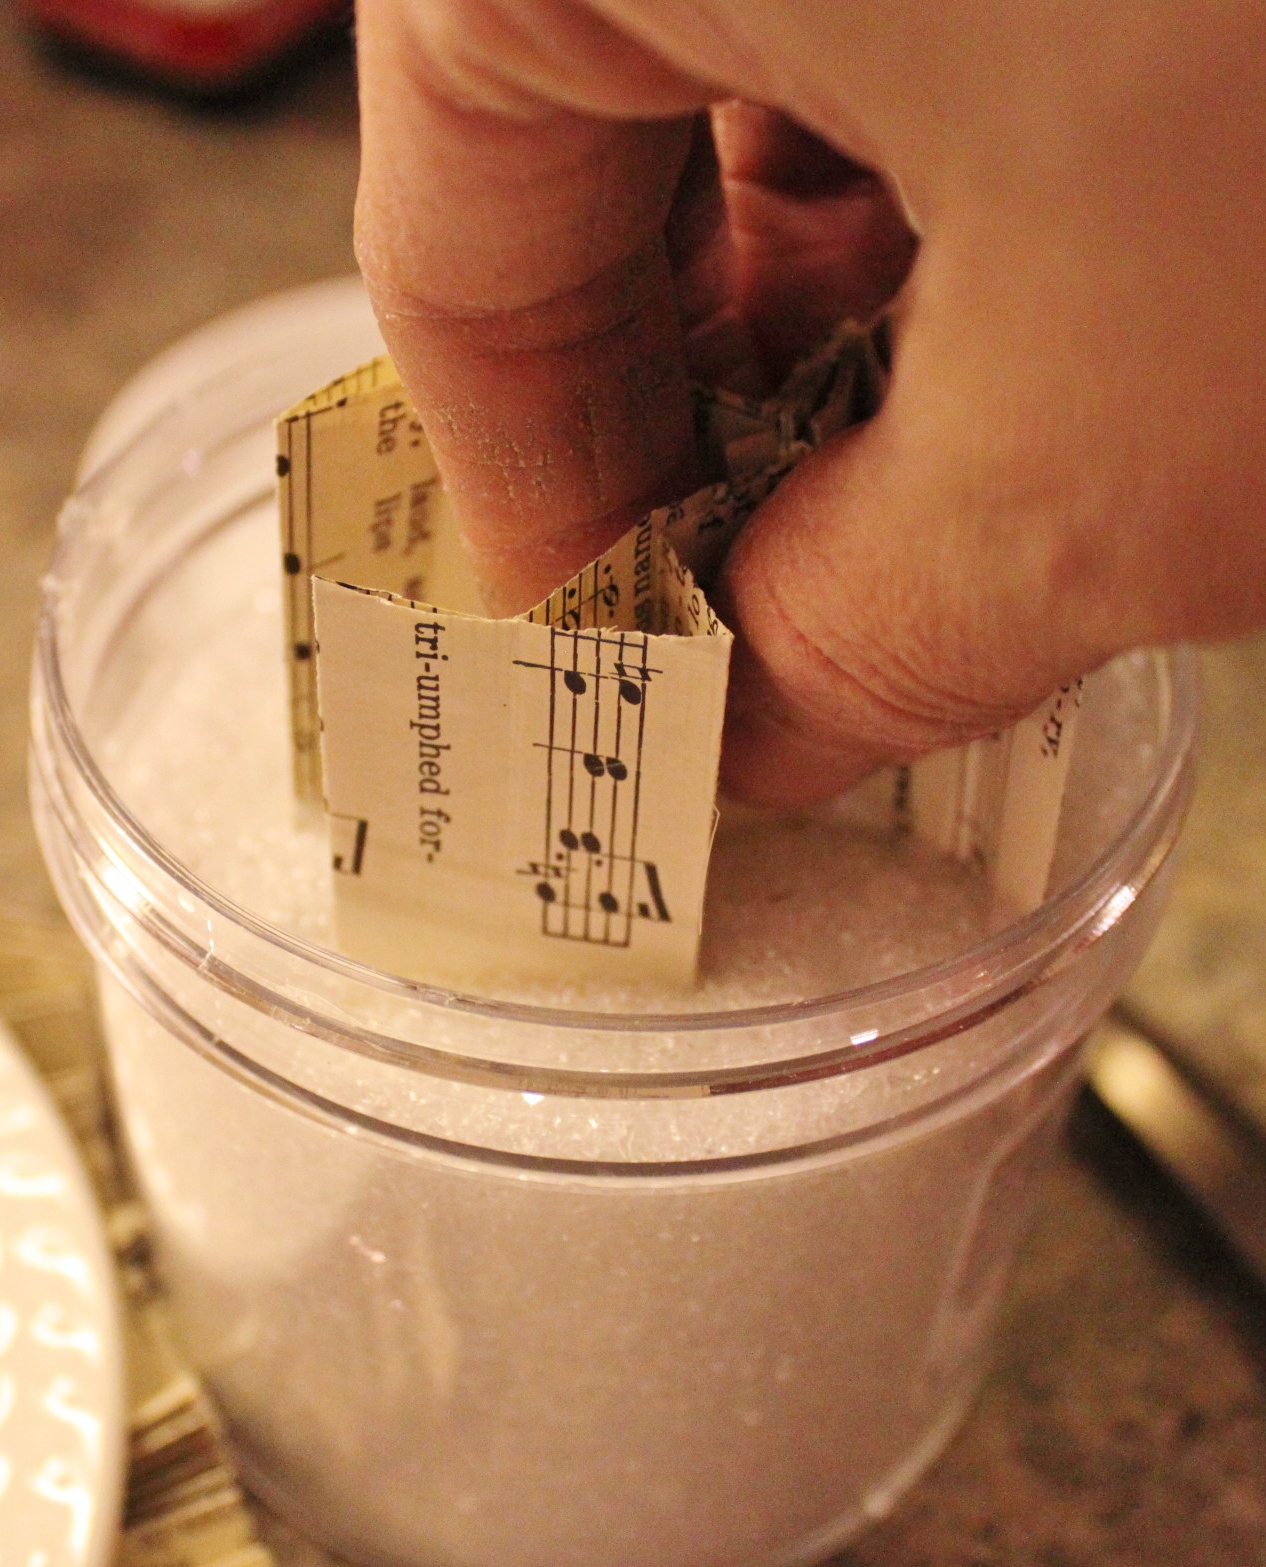
Glue the ends together just as you did for the larger one.  Then gather it in your hands and dip the ends in glue.


Then dip the ends in your glitter.  I use a crushed glass glitter.


Then you'll need to sit it on top of the larger circle and push down, just like you did with the larger circle.  This sits it down in the grooves of the other circle so it looks more cohesive.


Very gently, push inward until the smaller circle closes in as well as it can on the larger one.  Put a dab of hot glue in the center, and hold it in place until it sets.


Pick up the two circles as a unit, and dip the outer circle in the glue, and then the glitter.


I finish the centers of mine with a set of vintage buttons attached with hot glue.


The last step is to attach your string.  I use a thin hemp string.  Punch a small hole through one of your seams so that you have double thickness for strength.  You want the hole to be big enough for your string to fit through, but not excessively big as to invite tears.


Tie a knot, and wait for your glue to dry.  It will dry clear, and you'll be left with pretty glass glittered edges.


Hang on your tree, and enjoy!


Hope you're all having a great holiday season!


Sharing at:
Savy Southern Style
2805 Potpourri Party

Tuesday, December 6, 2011

Go ask. You never know what response you'll receive!

Sometimes I get SO lucky.  At least I think I do...but then again, I pick up a lot of stuff that I think is completely awesome, but most people think belongs in the dumpster.

Anyway.  I'm lucky.  I'm sticking by that.

Yesterday on my way home from the store, I drove by the corner house down the street from me and saw three guys with a trailer, and lots of wooden pieces (not complete pieces as I usually use that term, but actual little bits and pieces) sticking out.  Since I'm really good at being creepy, I stopped, and struck up a brief conversation.  I really was curious about the house- it has looked totally empty ever since we moved in.  The guy had just bought it, it had been empty over five years, and he was cleaning it out.

I was able to get in that I love taking old chairs, tables, dressers, small children, etc.  Okay, maybe not small children, but I felt like I should be telling him I basically take anything.  He told me he had found two pieces that were worth fixing (not dry rotted) that he was planning to keep, but really had more projects than he needed anyway.  He ran inside and came back with a captains chair from a dining table.  It was completely gray, but after some Clorox wipes, and Old English, it's back to it's self.  And that leather seat is in perfect, beautifully aged, condition.


He also gave me an old drop leaf table, and I pulled three drawers from an old treadle sewing machine cabinet out of his trailer.  The table needs a lot of cleaning, and some work, but it will be a cute a cute little farm table when I'm done.

This morning, the guy called back (because I was good enough to give him a card).  He had found another chair.  He told me it needed an arm repaired and reupholstering, but that I was welcome to come check it out.  I did.  I took it.  It has really nice lines, but it is really REALLY nasty.  Like- has mold growing on it nasty.


(Hello, mold.  Yuck.  Also- you can see the table in the background!)

I assume that I'll have to throw everything but the frame in the garbage.  No one wants an old moldy chair, even if it's been dressed back up in new clothes.  BUT- when she is all dolled up again, what a knockout she's going to be!  I just love that because I stopped and was a little creepy (again) and forward (again), that I saved a great old piece from being crushed and filling up a landfill.

Anyway, there she, and the table, sit on my front porch until hubs is home and not on call to help me maneuver them into the garage (because Lord knows what's hiding in that cushion, and it is NOT coming in my house until it's totally stripped down!).  My neighbors love me, you know?

Did I mention the best part to this whole find?  Not only did the guy take my card, keep it, and use it...but he gave me all this great stuff for the absolute best price- free...not that I would have given much for any of it in the condition all the pieces were in in the first place, but it's always nice for someone to just offer something to you.  It's also great that he has my contact info, so if he gets into another house that has some goodies in it, he knows who to call.

Moral of the story.  Sometimes it feels weird, and creepy, to go up to a complete stranger and ask if they have anything you want on a whim, but it can be totally worth it.  If you do this though, just be careful, and don't go into any houses alone, etc.  Common sense, girls!


Now, what should I cover and paint my new little chair in?  Ideas?

(More soon-- promise you'll have the ornament tutorial this week so you can make some fab ornaments BEFORE Christmas!)