I know I'm not the only mom with a little boy who LOVES doll strollers. Okay, so really, anything with wheels wins in his book, but something about pushing a stroller like mom really appeals to him. It's the first thing he runs to play with at friend's and family's homes with little girls. I always wanted to pick one up for him, but they're always bright, obnoxious pink or purple, and Hubs would have killed me if I brought one of those home.
Last week during a trip to a thrift shop, Mason found a stroller, a BLUE stroller, and he had to have it! At $1.50, I couldn't say no...especially when that would have ended up in a major melt down in the middle of the store...he already loved the thing! So we brought it home (after toting it around to three other stores first). Even though the main body of the stroller was already an appropriate navy blue, the seat was clad with blue and yellow plaid, and a huge teddy bear in the middle. I don't know who ever decided teddy bears should be all over kids' toys, but they should be shot. The teddy bear seat had to go.
As a side note- even if you can't find a stroller that's the color you want, there's no problem that a little spray paint can't fix! I was lucky to find a blue stroller, but the wheel caps were still a almondy faded/dirty looking color, so I sanded them lightly with a find sanding sponge, and painted them to coordinate (just used a brush, and dry brushed a few light coats since I already had a gallon of mixed paint that matched!).
The supplies you will need for this project are:
3 yards of double fold bias tape
2 feet of nylon webbing (you can reuse the webbed pieced from the original cover if desired-- I did!)
1/4 yard of fabric for each side (you can use different fabrics, the same, or make it one sided if desired)
sewing machine, pins, thread, seam ripper, and scissors
marking pen
First remove the seat from the frame. Then get going with your seam ripper. It's tedious, but just think about the huge smile that's going to radiate from your kiddos face when he sees his new stroller. When you're finished, you should have something that looks like this:
Discard the bias tape, and use the other two pieces as your pattern. If you want to bypass all the seam ripping, and just cut a pattern, I've made a rough (ROUGH okay? I'm not a Microsoft Paint artist, people!) sketch with the basic shapes and measurements of each piece (images not to scale).
Top
Seat
Trace your pattern on the wrong side of each of your fabrics, and cut them out.
Take your seat pieces and fold and press the side flaps in vertically until the are even with the rest of the u-shape of the seat.
Then fold and press the seat horizontally where you see the red line in the picture below. You want the bottom of the seat to fold up just far enough that the top of the flap is covered.
On the seat piece that you are using for the back/underside of your stroller, unfold the last fold you made, and pin your bias tape along the raw edge and sew it in place.
Note that your bias tape is slightly longer on one side than the other. The longer side should go to the underside of the project, and is designed this way to ensure your machine will grab it after stretching it around your project.
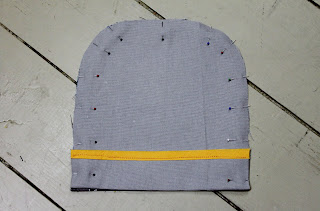
Then refold along your crease you pressed, and sew about a six inch line in the middle of the bias tape (try to sew along the same line you just created). This creates the pockets that the lower frame arms of the stroller fit into to hold it in place.
When finished with this step, it should look like this from one side (this will be the underside, visible portion):
and like this on the opposite side.
On the seat piece that will be the front, fold it in half to find the center, and pin sew the middle connector piece for the waist belt in place about four inches from the edge of the seat. I didn't get a picture of this as I was going, so the picture below shows more than what we've gotten to, but does show the correct placement for the connector piece on the seat bottom. If you need to make this piece, it is roughly six inches of webbing, with a loop sewn in end for the other pieces of the waist belt to fit through.
Now, pin the other piece of seat fabric to this piece so the the right sides are facing out, and the two together with no more than a 1/4" hem so that your bias tape will be able to cover it.
Sew the top pieces together the same way you just sewed the seat pieces together, matched up with right sides facing out.
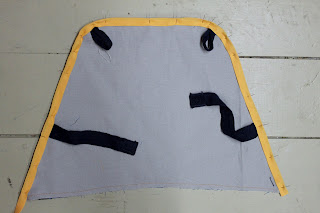
Cut two four inch pieces of webbing, make a loop, pin them to the top "corners" of the back side of the top piece, and stitch them in place.
Then pin and sew your waist belts to the front of the top piece, roughly five inches from the bottom. I reused the pieces that came off the original cover, but if you need to create new ones, the webbing should be about five inches long, and have a small square of velcro sewn to the finished ends.
I pinned and sewed my waist belts to the wrong side initially, and had to go back and change it, so do not follow my example picture to a t! I'm just showing you the approximate placement here.
Now pin your bias tape around the two sides and top of the top piece, and sew in place. It should look like this (only you should have waist belt straps on the front!) from the front:
and this from the back (you know...minus the waist straps...):
Now fold both your top piece, and your seat piece in half, and mark them with a pin.
Line the pins up with the bottom of the top piece, and the semi circle of the seat piece, same sides facing.
Begin pinning the top to the seat. As you pin, the top piece form around the bottom to look like this from the back:
And like this from the front (OMG! The waist straps finally appeared in the right spot!):
Sew the two pieces together, again using no more than a 1/4" hem.
Now pin and sew your bias tape starting all the way at the front of one side, wrapping around the back of the hem where the two pieces just met, and all the way around the other side. Leave the front piece uncovered.
Let me tell you, now that you've made it to the end of my sewing tutorial, that I'm not a seamstress, and I really don't know the appropriate ways to finish a piece, so from here on out is just what I did to finish my corners. I'm sure there is a better way, but this worked for me, and was pretty simple.
Pin your final piece of bias tape to the front piece, leaving about an inch of excess material on either side. Cut the back part of the excess bias tape off to look like this:
Then fold it down at a right angle.
And turn that angle over the back, and pin and sew in place. Cut the excess (the tape that is under my pointer and middle fingers) after you have sewn the front piece in place.
That's it! You're done with the cover! Go slide it onto the frame, and have a proud moment.
Then give it to your kiddo to enjoy!


