
A few weeks ago I showed you this chair:
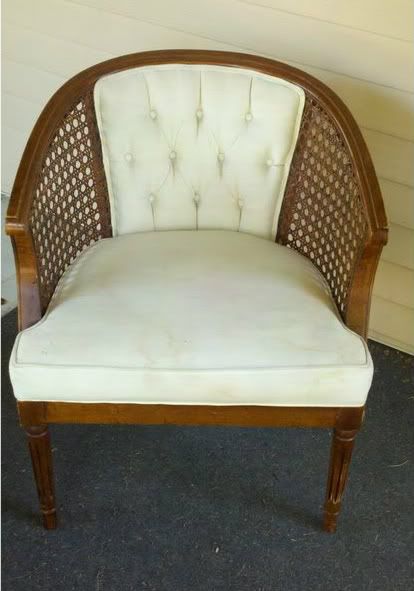
I picked it up for $5 at my local Habitat for Humanity. The frame itself was in good shape, and the caning was perfect, but the seat was stained, and the vintage distressed wood grain style...blech.
I have to admit...this little chair was my very first time upholstering anything. Because this was such a learning process for me, I didn't take pictures for a step by step for this project, but I'll breeze over basics.
I started out by removing the seat by unscrewing it at the bottom. From there I started the tedious process of pulling all the staples from the chair using a small flat head screwdriver and a hammer. While it may be tempting to just rip away to pull the fabric from the chair, don't! You need to save the material to use as a template to recover your chair. The padding in this chair was actually really in great shape despite the stains on the cushion, so I saved it to reuse as well.
*Hint-- have a heavy duty magnet on hand to pick up any stray staples you may drop-- save your vacuum!*
I sanded the frame lightly to remove the shine, and took it outside and sprayed it with Krylon's gloss black spray paint. Then I coated it with spray gloss polyurethane for extra protection.
I used the old seat fabric as a template and sewed a new seat, doing my best to line patterns up. This was also my first time making my own bias tape, piping, and double welt cord. I promise- I'll do a tutorial and all three soon.

Next came stapling the fabric in place, and that's where it went a little hairy for me. I've always read to pull down and diagonally. I don't know why, but I read that as PULL!!!!!
Okay- it's not, alright? It's about smoothing and making it snug- not pulling the life out of it...like I did. I pulled too tight on the seat, which made it IMPOSSIBLE to get a smooth, straight edge. I used my pneumatic staple gun to apply it, and once it was pulled, and stapled, it wasn't coming out unless I wanted to ruin the fabric.
Honestly- I wanted to. I wanted to rip it off, and resew the bottom/front of the cushion back on, but I was out of fabric to line up the pattern. I ran back to the store, and OMIGOSH, someone came in and bought the rest of the bolt that morning. Lucky me, since Jo Ann's is moving in November, they're not getting any new shipments until they move. I really didn't want to spend another $20 for the fabric with shipping to fix it since it's my "learner" chair. Lesson two-- allow yourself room to make mistakes, and BUY EXTRA FABRIC!
Remember the buttons I showed you how to cover here? Yes, I tufted the back of the chair with them.
Are you laughing at me? Tufting? An intermediate skill on my first ever chair? Yes. Okay, it was silly. But I tufted it. It was actually pretty easy (and I'm planning another project with tufting, so I'll show you how to then). The difficult part of this chair was that there was a channel that ran around the back where the fabric needed to be stapled precisely, or else you'd shoot through the frame. Ask me how I know!? It was really discouraging, and made it really hard to apply even pressure and accurately staple. Next time- no channels.
Anyhow, I stapled the back of the chair on first, from the front, then the front tufted part. I removed staples ten million times, had to repair some damaged wood, repaint, and restaple a few times, but eventually I got all the fabric on (I seriously hated that channel). I used heavy duty hot glue to attach my double welt cord, and that was that. I put it in my sitting area at the top of the stairs next to my cute little $6 red metal stool (swoon! look at the rust and little wood casters!) topped with a potted indoor fern that I sat down inside a vintage egg basket that I found at The Salvation Army for $1.50 (!!!!!!).
I'll be nice, and save you from scrolling-- the before one more time:
And After:

P.S.-- I practically STOLE that chandelier, and I have to show you it's before and after still too...as soon as I find 3" socket covers. I have been SO busy!

Mason's been enjoying having a chair in the little nook too...especially since it's just wide enough to drive his "choo-choo" on.


Love the chair & I love your humor. I cracked up when I saw your post about mellow yellow & showed my hubby. I was singing the song earlier today & he just called me crazy for singing it out of the blue lol
ReplyDeleteokay, i'm doubly impressed now!! this is your FIRST upholstery piece??? man, you are not easily intimidated, are you? i think we're going to be great friends!!
ReplyDeletecan't wait to see what's comin' next!!
and what is that AMAZING fabric????? i found two similar chairs (under my Finding A Flea post) and i'd love to pick that up!
and i need a tutorial!! how did you learn to pipe???
omg. done gushing.
amy
You did a FABULOUS re-do on this chair. I'm very inspired by you and others like you. Thank goodness for the internet. But I can't help but feel ripped off... I just paid $80.00 for two cane chairs at my local Salvation Army store. Maybe it's because I'm in Canada... you seem to get all the deals in the USA. Anyhow... I still feel like I got a good deal and I'm going to use your tutorial to do these chairs a wonderful makeover. Thanks for the inspiration.
ReplyDeleteBeautiful job! I'm thinking we must be in fairly close proximity, geographically speaking, from what I've read here on your blog so far. I'm inspired by your fearlessness on tackling the upholstery work! I've been looking for local "schools" to learn but alas, they're all nearly 300 miles or more away. Anyway, I've bookmarked your blog and appreciate your generosity to share your time and work.
ReplyDeleteMke
OMG. Can you teach me how to do something like this? I have been drooling over all of your upholstry jobs. We need to have a playdate sometime and gets some things going!
ReplyDeleteI recently picked up a cane back barrel chair I am going to try to reupholster. I appreciate your tips to assist in my own journey. Thanks.
ReplyDeleteThis is a great inspiring article.I am pretty much pleased with your good work.
ReplyDeleteWood Kitchen Table Sets
Dining Room Furniture Sets
Furniture Parker
Bench Table And Chairs
How much fabric did you use? I have collected several of these and I’m trying not to spend a fortune on the fabric:/
ReplyDelete